odysee Augmented Startups 2021年06月10日より。
ハイライト:
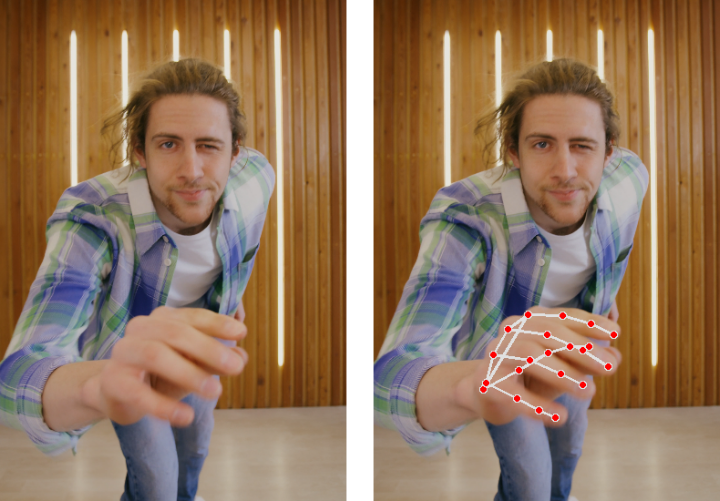
- OpenCVとMediaPipeで、画像から手の部分を検出してみます。
Hand Tracking 30 FPS on CPU in 5 Minutes | OpenCV Python |
| 00:00 | If you ever watch Iron Man or Minority Report, you'll see how they manipulate holograms and virtual objects just by using their hands. | 「アイアンマン」や「マイノリティ・リポート」を見たことがあるなら、手だけでホログラムやバーチャルな物体を操作する様子がわかると思います。 |
| 00:07 | Hand recognition and object manipulation is not something new. | 手の認識とオブジェクトの操作は、新しいものではないのです。 |
| 00:11 | Virtual reality headsets like the Oculus Quest 2 released a relatively new feature which allows you to use your hands instead of a controller. | オキュラス・クエスト2のようなバーチャル・リアリティのヘッドセットでは、コントローラの代わりに手を使う、比較的新しい機能がリリースされました。 |
| 00:18 | This is really cool because it's so much more intuitive to use our hands rather than controllers to interact with virtual objects. | これは本当にクールだと思う。仮想オブジェクトと対話する時にコントローラではなく手が使えれば、とても直感的ですものね。 |
| 00:24 | The easiest way to implement your own hand gesture recognition is by using Leap Motion, which has great performance; | ハンド・ジェスチャー認識を最も簡単に実装するには、素晴らしい性能を持つLeap Motionを使う方法があるけど、 |
| 00:31 | but your app will require an external sensor and is quite processor intensive. | アプリには外部センサーが必要だし、プロセッサパワーをかなり消費してしまいます。 |
| 00:37 | But what if there's a way to do this just by using a single camera and in real time? | だけどね、もしこれを1台のカメラで、しかもリアルタイムに実現できるとしたらどうでしょう? |
| 00:42 | So today, if you watch till the end, I'm going to show you how to implement hand pose estimation at 50 frames per second on CPU using Python. | そこで今日は、Pythonを使って、CPUのみ50FPSで再生できる、手のポーズ推定を実装する方法を紹介します。最後まで見てくださいね。 |
| 00:50 | But first, let's find out what it is, how it works, and where you would use it. | その前に、手のポーズ推定とは何か、どのように動作するのか、どこで使うのかを説明しましょう。 |
| 00:56 | In basic language, hand Pose estimation is the task of finding key point features of our hands from images and video. | 手のポーズ推定とは、基本的には画像やビデオから手のキーポイントとなる特徴を見つけ出す作業です。 |
| 01:03 | So these key points or landmarks correspond to the joints in our hands, you know, the parts that move. | このキーポイントやランドマークは、手の関節、つまり動く部分に対応しています。 |
| 01:09 | They say that when you detect a thumbs up, it'll get people to like and subscribe to this video. Jokes aside. | 親指を立てているところを検出すると、この動画に「いいね!」や「サブスクライブ」をしてくれるようになるそうです。冗談ですけど。 |
| 01:15 | There are many frameworks out there that already allow you to do single camera handpost detection and tracking, such as Handmap, Awesome-Hand-Pose, Hand 3D, amongst many others. | Handmap、Awesome-Hand-Pose、Hand 3Dなど、すでにシングルカメラで手指の検出と追跡ができるフレームワークがたくさんあります。 |
| 01:26 | But for our implementation, we're going to be using MediaPipe, which is Google's open source cross platform framework for building cool computer vision apps. | しかし、今回の実装では、クールなコンピュータビジョン・アプリを構築するための、Googleによるオープンソース・クロスプラットフォームのフレームワークである「メディアパイプ(MediaPipe)」を使います。 |
| 01:34 | We'll be using MediaPipe hands that employs machine learning to infer 21 3D landmarks of a hand just from a single frame. | メディアパイプ・ハンドは、機械学習を利用して、1つのフレームから手の21個の3Dランドマークを推測します。 |
| 01:40 | What's really amazing is that you don't need any expensive equipment like scarce and emotionally unavailable Nvidia GPUs. | このフレームワークの何がすごいって、希少でとてもじゃないが入手できないNvidia GPUのような高価な装置が不要なこと。 |
| 01:48 | In a nutshell, how it works is that the model first performs palm detection using a slower single shot detector, but optimized for real time mobile use. | 簡単に説明すると、このモデルではまず、より低速なシングルショット検出器を用いて手のひら検出を行います。これはリアルタイムのモバイル使用向けに最適化されています。 |
| 01:57 | Palm detection was selected over hand detection; | 手のひら検出を、手全体の検出に先がけて行うわけ。 |
| 01:59 | because estimating bounding boxes of rigid objects like palms and fists is significantly simpler than detecting hands with articulated fingers. | なぜなら、手のひらや拳のような剛体オブジェクトの境界ボックスを推定する方が、指が連結された手を検出するよりもはるかに単純なのです。 |
| 02:07 | They also achieved an average precision of around 95%, which is excellent. | また、平均精度は約95%と優れた結果が出ています。 |
| 02:12 | Next, they passed the region of interest to a hand landmark model, which performs key point localization of the 21 hand shaped coordinates inside the detected region. | 次に、注目領域を手のランドマークモデルに渡し、検出された領域内の21個の手の形の座標をキーポイントとして、位置を特定する処理を行います。 |
| 02:21 | This method, as I mentioned, is robust enough to detect both partial and fully visible hand movements. | この方法は、先ほど言ったように、部分的な手の動きと完全な手の動きの両方を検出するのに十分な堅牢性を持っています。 |
| 02:27 | Cool! So before we get into the tutorial, if you're just starting out in computer vision, the way to build computer vision apps is to use OpenCV. | かっこいいよね! チュートリアルに入る前に、もしあなたがコンピュータビジョンを始めたばかりなら、コンピュー・ビジョンのアプリを作る方法は、まずOpenCVを使うことです。 |
| 02:35 | Right now, OpenCV have just launched a Kickstarter campaign for a brand new OpenCV for beginners course. | 現在、OpenCVは初心者向けの新しいOpenCV学習コースのキック・スターター・キャンペーンを開始したところです。 |
| 02:42 | You can see from the page they've already surpassed their goal and are backed by over 1000 backers. | このページでは、すでに目標金額を超え、1000人以上の支援者に支えられていることがわかります。 |
| 02:47 | So if you'd like to learn to build your own exciting computer vision applications with OpenCV and start your AI journey; | もしあなたがOpenCVを使ってエキサイティングなコンピュータビジョン・アプリ作りを学びたいなら、そしAIへの旅を始めたいなら、 |
| 02:54 | then click the link down below to implement this, let's go over to the vision store. | リンクをクリックして、Vision Storeに移動してください。 |
| 02:58 | Click on Hand Detection, ensure that you're logged in. Otherwise you can sign up. | ログインしたらHand Detectionをクリックします。初めてならまずサインアップをしておきましょう。 |
| 03:03 | And show that you have all of the requirements, in this case any PC, webcam as well as Python installed, along with the PyCharm Community development environment. | PC、ウェブカメラ、Pythonのインストール、PyCharmコミュニティ開発環境など、すべての要件が揃っていることを確かめて下さい。 |
| 03:12 | You can download all of the files here. | 必要なファイルは、ここからダウンロードできます。 |
| 03:14 | Step 1 is to once Pycharm Community has been installed, create a new project and let's call it "Hand Pose". | ステップ1では、Pycharmコミュニティをインストールした後、新しいプロジェクトを作成します(ここでは "Hand Pose"としておきましょうか) |
| 03:22 | You'll be required to only install 2 dependencies OpenCV and MediaPipe. | OpenCVとMediaPipeの2つだけをインストールします。 |
| 03:27 | It's highly recommended that you use the exact same versions mentioned here, for compatibility with the code. | コードの互換性のために、ここで紹介したものと全く同じバージョンを使用することを強くお勧めします。 |
| 03:35 | You can delete the main.py as well as you won't be using this. | main.pyは使用しないので、ファイルを削除しても構いません。 |
| 03:39 | And lastly, you can either import the code from the Vision Model page or from the downloaded files. | そして最後に、コードをインポートします。Vision Modelのページからインポートしてもいいし、ダウンロードしたファイルからでもかまいません。 |
| 03:45 | Otherwise, let's dig into the code. | あるいは、コードを念入りに見ていきましょう。 |
| 03:47 | So the code is broken up into 2 sections. | コードは2つのセクションに分かれています。 |
| 03:49 | The first section is for inference on single images and the second is for inference on videos. | 最初のセクションは単一画像に対する推論、2つ目はビデオに対する推論です。 |
| 03:54 | So first we import our libraries. | まず、ライブラリをインポートします。 |
| 03:57 | Next we set static images mode to be true. | 次に、静止画モードをtrueに設定します。 |
| 04:00 | So this tells our model whether we want to treat input images as either a batch of static and possibly unrelated images or a video stream. | これは、入力画像を静止画のバッチとして扱うか、ビデオストリームとして扱うかを指定するものです。 |
| 04:08 | We set the maximum number of hands that you want to detect to 2. | 検出したいハンドの最大数を2に設定します。 |
| 04:12 | You can increase this to detect more hands. | より多くのハンドを検出したい場合は、数字を増やします。 |
| 04:15 | Next, we set our detector sensitivity to 50% to read our image and let the model process and predict potential hand pose. | 次に、検出器の感度を50%に設定して画像を読み取り、モデルによる処理と手のポーズの可能性の予測をさせます。 |
| 04:24 | For each hand that we detect, we want to print the fingertip coordinates and then draw the landmark coordinates over the image and save it. | 検出したそれぞれの手について、指先の座標をマークし、画像の上にランドマーク座標を描いて保存したいと思います。 |
| 04:31 | The same occurs in the second section, but with video. | 第2部でも同じことが行われますが、これは動画の場合です。 |
| 04:34 | We first load up our video stream read in each frame of the video, and then each image is saved in a container called Results. | まず、動画の各フレームを読み込んだビデオストリームを読み込み、各画像をResultsというコンテナに保存しています。 |
| 04:42 | And this all happens during the processing phase. | これはすべて処理段階で行われます。 |
| 04:44 | We also overlay the frame rate using the calculated inference time between the frames before displaying the video with the handpoze landmarks displayed in real time. | また、ハンドポーズのランドマークをリアルタイムで表示したビデオを表示する前に、フレーム間の推論時間を計算してフレームレートをオーバーレイします。 |
| 04:54 | So to run the code either on a single image or on video that came with the download files, you just need to click the Play button. | このように、1枚の画像やダウンロードファイルに付属するビデオでコードを実行するには、実行ボタンをクリックするだけです。 |
| 05:04 | To run this on a webcam, you can simply change the name of the file here to 0, and then you'll be able to detect poses using your webcam. | ウェブカメラで実行するには、ここのファイル名を0に変更するだけです。ウェブカメラから入ってくるポーズ検出ができるようになります。 |
| 05:17 | For now, if you have enjoyed this 5 minute tutorial in computer vision at our other models on our Vision Store, only on augmentedstartups.com. | まずは、この5分間のコンピュータビジョンのチュートリアルを楽しんでいただけたなら、augmentedstartups.comにあるVision Storeの他のモデルもご覧ください。 |
| 05:25 | The Vision Store is where you can download and implement projects without wasting too much time and is meant for rapid prototyping and quicker time to market. | Vision Storeは、あまり時間をかけずにプロジェクトをダウンロードして実装できる場所であり、ラピッドプロトタイピングと市場投入までの時間を短縮するためのものです。 |
| 05:33 | Otherwise, you can check out all our comprehensive courses in pose estimation, computer vision, AI and robotics. | その他、ポーズ推定、コンピュータビジョン、AI、ロボット工学の包括的なコースをすべてチェックできます。 |
| 05:40 | Also, be sure to like this video subscribe with that bell icon for more computer vision tutorials and also so I can beat the YouTube algorithm and get 2000 subscribers. | また、このビデオに「いいね!」を押して、ベルアイコンで登録すると、より多くのコンピュータビジョンのチュートリアルが見れます。YouTubeのアルゴリズムに勝って2000人の購読者を得たいですね。 |
| 05:50 | Comment down below if you'd like to see a video tutorial on Yolov in 5 minutes. | 「5分でできるYolovのビデオチュートリアル」を見たい方は、下のコメント欄にご記入ください。 |
| 05:54 | For this implementation, however, we'll be using Plays Pose, which is a lightweight CNN architecture for human pose estimation; | この実装では、人間のポーズ推定のための軽量なCNNアーキテクチャであるPlays Poseを使用することにします。 |
| 06:02 | that is tailored for real time inference on mobile platforms. | これは、モバイルプラットフォームでのリアルタイム推論用に調整されています。 |
| 06:05 | What's really cool is that during inference, the network produces 33 body key points for a single person and runs at over 30 frames per second. Crazy, right? | 本当にすごいんですが、推論中にネットワークは、人間一人あたり33個のキーポイントを生成し、30FPS以上で動作するのです。いやはやまったく。 |
練習コード
# MediaPipe Handを学ぶ

import cv2
import mediapipe as mp
mp_drawing = mp.solutions.drawing_utils
mp_hands = mp.solutions.hands

# 静止画
with mp_hands.Hands(
    static_image_mode=True,
    max_num_hands=2,
    min_detection_confidence=0.5) as hands:

    image = cv2.imread('sample1.png')  # サンプル画像
    # BGR画像をRGBに変換してから処理する
    results = hands.process(cv2.cvtColor(image, cv2.COLOR_BGR2RGB))
    if not results.multi_hand_landmarks:
        print("Continue")

    # 手のひらとランドマーク
    print('Handedness:', results.multi_handedness)
    image_height, image_width, _ = image.shape
    annotated_image = image.copy()
    for hand_landmarks in results.multi_hand_landmarks:
      print('hand_landmarks:', hand_landmarks)
      print(
          f'Index finger tip coordinates: (',
          f'{hand_landmarks.landmark[mp_hands.HandLandmark.INDEX_FINGER_TIP].x * image_width}, '
          f'{hand_landmarks.landmark[mp_hands.HandLandmark.INDEX_FINGER_TIP].y * image_height})'
      )
      mp_drawing.draw_landmarks(
          annotated_image, hand_landmarks, mp_hands.HAND_CONNECTIONS)
    cv2.imwrite(r'sample2.png', annotated_image)
サンプル画像